Showing posts with label DIY. Show all posts

Thursday, February 19, 2015

My Vintage Vanity: Sewing Patterns

Signing up for the Vintage Sewing Pledge 2015, meant I had to go through my collection of vintage and retro sewing patterns. I thought it would be fun to share a little glimpse!


In my sewing room I store them in a bin on my bookcase. All of my commercial patterns are vintage or repro/retro and are stored in the red bin. In the black bin are my own drafted patterns which I tend to use more often. 


What I love about the vintage pledge is that it is forcing me to use my collection of purchased patterns and not just collect them. 


These are some of my repro and retro patterns. I love that the pattern companies are re-issuing old hard to find vintage patterns. I've chosen most of these for my pledge!


A small sampling of my vintage dress patterns. I really need to utilize these more!


Vintage lingerie, nightgowns, and bed jackets. Love!


Vintage jackets and coats. 

The possibilities are endless! Do you collect vintage sewing patterns? Do you use them or are they more for inspiration? Have you joined the vintage pledge?


Thursday, December 4, 2014

My Projects: Pattern Rub-Off Tutorial

Pattern rub-off skills can be quite handy! The idea here is not to copy but rather preserve a pattern of either something that fits you really well or something that is destroyed beyond repair. 

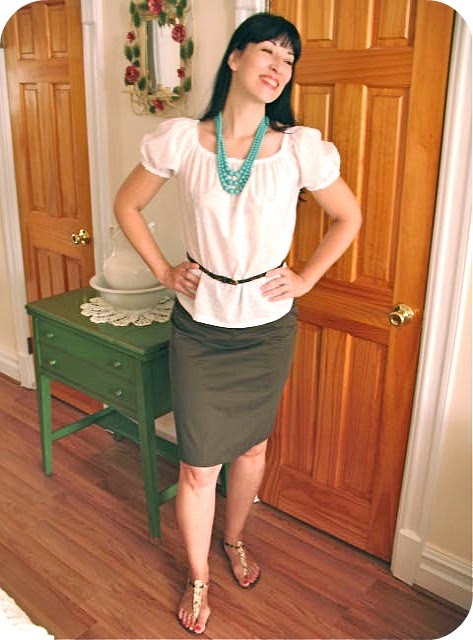
Last Summer, I made a pattern rub-off of one of my favorite pencil skirts. I love the fit of this skirt and was deeply disappointed when the brand didn't offer one in simple solid black. Really? Therefore, I decided to make one myself! I also made one in army green and am currently working on one in a lovely charcoal wool with herringbone stripes. 

 Finally, here is my tutorial. This pattern is really simple, and I suggest starting with a simple item like this from your closet. Let's get started, shall we?


1. Tools you will need:
* favorite item from your closet
*measuring tape
*muslin
*pins
*scissors
*pencil
*pattern paper
*tracing wheel (pictured below)
* Ruler (pictured below- hey I don't do tutorials very often!)

2. Find your center front and center back. Mark with a pin at both the top and bottom of the garment.
3. Put pin markers where darts end, or anything of interest. It could be area of shirring, or pleats.
4. Mark your muslin. In design school we used to have to pull the warp out. Now I mark with pencil. Dig that lead in the groove of the weave and mark your long grain. This will help you see that your fabric is straight. If it is crooked, block your fabric to get that grain line straight! 
5. Place that line on your muslin on your center front (or center back, center side etc.) and then start to define areas of interest, like this dart. Pin in the amount to keep your fabric flat. 

6. Number 5 is so important, I have repeated it for No. 6. Did you get that? This is what will shape your garment and a huge part of why this garment fits you so well. Go back and make sure your darts are perfect!
7. With your pencil mark those pins and mark the edges of your garment. Hence the term rub-off. You can use chalk as well. 
8. Everything marked? Make sure before you un-pin! Take your muslin and lie it on top of the pattern paper. Label your grain lines so you know what piece is what. They will all look the same! 
9. Time to mark your paper below with the tracing wheel. The teeth will make marks you can trace over. 

10. Look closely and you will see the teeth marks. Pencil over those marks but with your ruler and "true" them up.  They might be wavy, so you need to make sure you have straight lines with natural body curve. 
11. Mark your pattern pieces. Are you cutting 2 or 1 on the fold? Is it the center back, center front, side front? You will need to know this later.
12. True up your darts and add your half inch seam allowance, or 5/8" if you prefer. Also add notches, so when the pattern comes off your fabric later you will know what is what. 
13. Choose your fabric and lay out your pattern and cut out your new dream item! May be best to try a muslin version first and tweak your pattern if necessary. Especially if your project is much more complicated than a 2 piece pencil skirt pattern. 


Finished pencil skirt #2! Army green stretch cotton! Soon my closet (pictured behind me) will be full of these pencil skirts in many fabrications! 
Oh, and the peasant blouse I am wearing was handmade too, from a vintage pattern. More info on that here

Let me know if you have any questions and what patterns you make. 
 Good luck!

Monday, November 26, 2012

My View: Craftsy Knit Lab

I started taking a basic knitting course online at Craftsy! It's called Knit Lab and it covers all of the basics like casting on, knitting and purling, knitting lace, increases and decreases etc. I taught myself to knit about 4 years ago from books, took a long break to recover from a hand injury and started back up about 2 years ago. You know when you teach yourself, you always feel like you are doing something wrong? Well I have and so I've been wanting to take a class at a local yarn stores but my full time job leaves me no time to match those schedules. 
As an alternative, an online course is just the perfect thing as I can take it any time I want. Craftsy has all kinds of classes from basic knitting like Knit Lab to more advanced techniques. There are also other categories like crochet, jewelry, sewing, paper crafts, and even cake decorating! So much fun and endless possibilities! 


I took some screen shots of my class. I hope you can see them. You can start and stop the class as often as you like, and you will always have the class in your profile to go back to and reference. If you're busy like me, you will love this feature! You can also ask questions on the top right and see other questions and answers posted buy others! 


Stefanie Japel, the instructor of my class is very knowledgable! A class materials guide is also provided that includes patterns for the projects you get to make in the class. I'm going to make a lacy scarf that I will share with you. Once I get to the next step I can continue the class and knit along! 


Isn't this cute? 

One thing I've learned so far is that I knit in the English method and not Continental. I had no idea! 

Have you taken a Craftsy class? If you're on Craftsy, my profile is BobbinBombshell. I've got some projects up there and I love to see what others make. Stop by and share! 

Oh! All classes are $19.99 or less today for the Craftsy Cyber Monday sale! Buy now, learn later! 

Wednesday, May 2, 2012

Mid-Week Inspiration: The Bow Mani


I found this wonderful DIY tutorial for a painted bow mani at The Beauty Department. I don't have the patience to do my own nails but I would love to give this a try. So adorable and I love that mint color. Would also look stunning with red! 

Thursday, November 5, 2009

Basic Setting Patterns for Vintage Hairdos by Pete

Guest blogger, Pete from incurlers, is back with the second installment in a series about classic hairdressing and wet sets. If you haven't read the first article on Basic Wet Sets, please do before continuing.
*****
The whole idea of a wet set is for the hair to retain some of the shape given to it by being wrapped around curlers as it drys. As you can imagine, the pattern of how you set the rollers does have an effect on the finished hairstyle, but not as much as you might think. The combing and teasing can significantly shape the final hairdo. The great thing about this is that even if you are new at wet sets, and you curlers aren't as neatly set as you might want them to be, you can still turn the result into a great hairstyle.
There are probably about four basic setting patterns. Perhaps the most common and easiest to do is the one shown below:

Set 'n Style 1976

Set 'n Style 1976

To set your hair this way, comb you hair from the forehead back, and then left and right towards each of your ears, leaving about a roller's width of hair going back from you forehead. Start with the roller at your forehead and add one after another going back till you run out if hair at your neck. Once done with that row, put an extra pik though each adjacent pair of rollers if you feel any are in danger of falling out.
Now do the left and right rows in a similar way, and then fill in the spaces in the back with rows if possible. Once dried, this is often used as the foundation for hairdos with a lot of volume on top,and/or a bit of flip on either side. Comb back and sideways for a style as shown. You can vary the set with different size rollers or the direction in which you roll them. If you want a very curly tousled look, try rolling smaller adjacent curlers in alternate directions.
The second most common is the halo pattern:

Set 'n Style, Winter, 1982 Set 'n Style, Winter, 1982

As you can see for the diagram, its called a halo because a row of curlers forms a halo around your face. The rows are wound towards the ears left and right from where you want the part in your hair to be. The back then filled in with neat rows. A setting like this often lends itself to itself to beautiful gently flowing waves combed left and tight from the part as shown in the photograph. Be sure to wind the curlers left and right form where you want the part, otherwise you will end up fighting the set when trying when combing out you hair.


The brick pattern is a slightly harder to do setting pattern:

American Hairdresser, July 1971

American Hairdresser, July 1971

This pattern is either for more solid styles, or curls all over. It is of course called a brick pattern because every row or rollers is often offset by half a roller length, so they resemble bricks in a wall (although in the example picture this is not the case). To set you hair like this, start with a neat ring of curlers around your face, then work back row by row. It gets harder to keep the rollers in the required pattern as you get towards the back. If you are lucky enough to have half length rollers (common in the 60s, rare today) you can use them to re-position your row of curlers. Otherwise , just make do – its less critical in the back anyway. Like the other settings, if some of your curlers are in danger of falling out place a pik though a few rollers to hold them in place. Comb upwards for a style like in the diagram.

And finally random rollers, the easiest to do:

Over 200 New Hair Setting Patterns 1969
Great for lots of “mussed up” waves or curls, pick smaller rollers for curls, and larger ones for waves, and set them in no particular order. Just make sure that all of you hair is in in curlers, and and try an keep most of the rollers the same size for best results. Easy to do, and great results!

Slight variations on each of the above can be done to emphasize certain styles, often by placing rollers in front in slightly different directions. An example is shown below:

Set 'n Style, Winter, 1982

Notice how the two angles rollers on the forehead adds just a bit of curl to the part in her hair and looks great!

The best source of more information about setting patterns and how they relate to hairstyles are vintage magazines. The ones to look out for are titles like “200 Setting patterns”, “Set 'n Style” and some issues of “Woman's Day” and similar household magazines. eBay is a good place to look if your interested, but be warned: sometimes people seem to go a little bidding crazy – you really shouldn't pay more than $15 or so for a vintage magazine. If you can get one of these vintage magazines that is devoted to setting patterns, you will have about the best piece of reference material you can find. And remember, don't hesitate to experiment: the great thing about a wet set is you can always wash it out if you don't like it.

*****
Thanks Pete for another informative and inspirational article!! I myself can't wait to try the Halo Setting. I think it will work well with my long hair.
Dear readers, don't hesitate to send me pics of your settings and styles that you have learned here. I'd love to feature you!!


Tuesday, September 29, 2009

My Projects: Veiled Feather Headband DIY

I've been working on a lot of new veiled feather headbands this week for my retro-inspired handmade Etsy shop, The Sparkling Cocktail. I've got quite a few made and will be listing them for sale this week. Instead of just showing you pictures of my creations I thought I'd give you a little tutorial in case you'd like to make one of your own!

Here we go!
Supplies: Scissors, black thread, needle, black satin headband (this one is 1"wide), black French netting 8" X 9", two feathers (color of your choice), and large gold button (with holes, not a shank).
Gather the netting off center so that the finished edge of the netting runs along the edge of the front of the headband. Stitch down by hand. Make sure all of the gathers are tacked down. The gathers puff the netting out so that it will fall around the front of the face. The bottom edge of the netting should form an asymmetrical line across your face.

Tack down with needle and thread the netting on the sides. One spot on each side will do.

Layer your two feathers over each other. I have chosen a large fluffy white feather under a smaller gold toned feather with stripes. Place them over the gathered tulle on top of the headband pointing out over the puff of veil so it cascades over your forehead. Stitch in place.

Finally to cover the edges of the feathers and to add more decoration sew on your button. You could also use sequins, bows, flowers...whatever suits your fancy!

Voila!
Be sure to check out my Etsy shop, The Sparkling Cocktail, this week to see the other variations I have made! If you attempt to make one these, please send me photos of your creations. I'd love to post them!

Monday, October 13, 2008

Vintage Finds of the Week:Knitting Magazines


Being a novice at knitting I realize it will take me forever to knit all of the wonderful patterns that are in these vintage knitting magazines. That doesn't stop me from being inspired by them. Here are some I found on Etsy. From top to bottom:

Vintage Workbasket Craft Magazine- $5- ItsBella
1949 Vogue Knitting Magazine-$26.85- LunasLoot
Knitting Book Pattern Magazine-$5-Thecuriousgirl