Showing posts with label my projects. Show all posts

Tuesday, March 17, 2015

My Projects: Gray Day Scarf

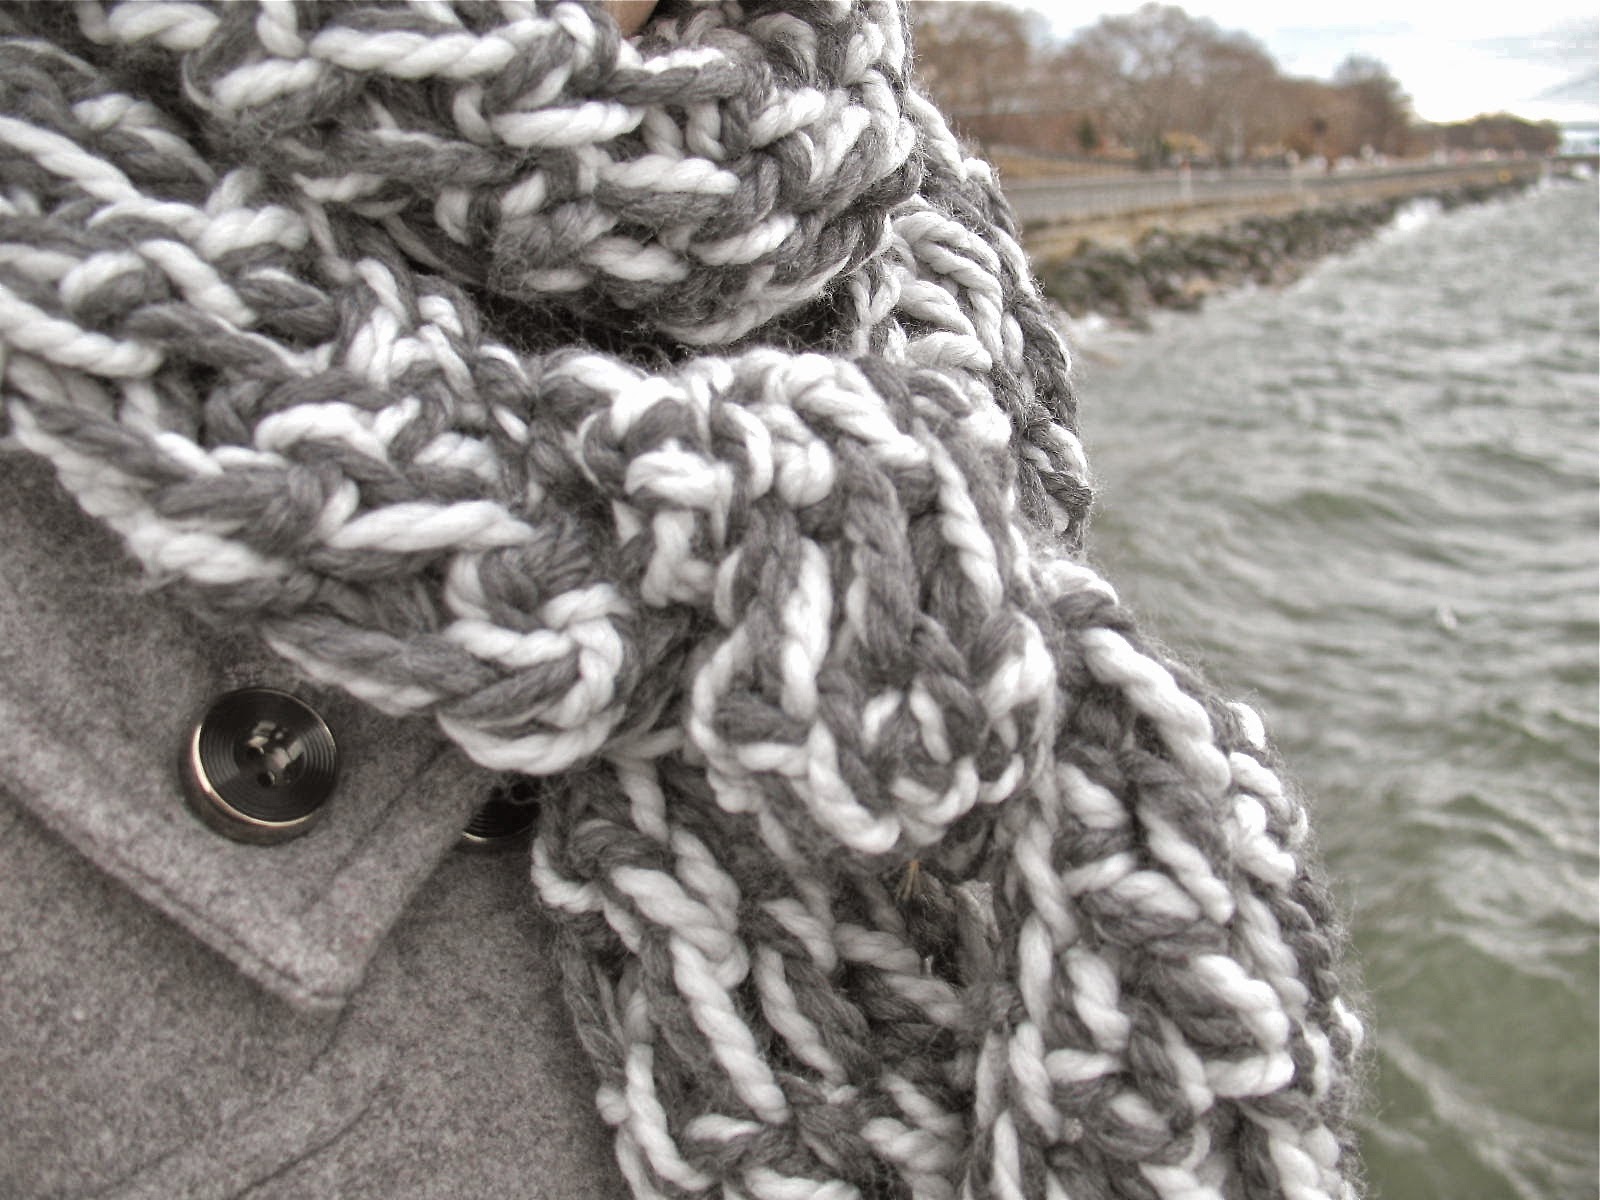
I finally have photos of this open work scarf I finished about a month ago. It's perfect for these brisk days in March where it feels like it's warming up yet the chill still gets to your bones. 


I call it Gray Day Scarf.


We went for a walk along New York Harbor. The sun was trying to come out yet winter is not ready to let go.


Made from a an easy open work pattern on large needles, this scarf is a quick knit. I used two strands of bulky yarn in two shades of heather gray. 
The pattern is from the same designer as my Asphalt Infinity Cowl I finished not that long ago.


Pattern: Misti Net Scarf from Knit1LA. This pattern is free and easy! 
Yarn: Knit Picks Biggo in Dove Heather and Cobblestone Heather. One skein of each. 50% Merino and 50% Nylon. Super soft!
Needle: Size 19. 
Verdict: Love Knit1LA's patterns! Large knits that are easy, fast, and stylish. Also love the fringe! Will remake in other colors. Also great for quick last minute gifts. 

Thursday, February 5, 2015

My Projects: Vintage Sewing Pledge 2015


The Vintage Pledge hosted by A Stitching Odyssey and Kestrel Makes is back! I'm very excited about it this year, as I will be starting at the beginning of the year. Last year, you may remember, I had only discovered the Vintage Pledge 2014 in May. I was amped up about it and made a peasant blouse but then my sewing machine (that I had had for over 20 years) died. It wasn't a happy time. 

A few months later, I got a new machine. A Janome HD-1000, that I love! I made some items for my Etsy shop and worked on my pencil skirt pattern, but never dug back into the vintage sewing I had set my sights on. The next thing I knew, it was the holidays! 

So here we are, 2015, and I'm ready to pledge again. I have pledged to make 5 garments. I have already decided what they are. Here's my plan! 


Simplicity 6341. 
I have bought some white cotton for this. It's basically a Swirl Dress, so what is not to love? I can see this being made in several summer fabrics and being my essential summer go to! 


Butterick B4919. 
I love everything about this. I want to find a cotton stripe fabric and start with the shorter length.


Butterick B5895.

This is a Pattern by Gertie and I'm sure you've seen this on every vintage sewing blog. Now it's my turn. I hardly ever wear pants, so this should be pretty interesting. I am counting this as 2 entries. The top I will make in red & white gingham and the pants in a red stretch cotton satine. Fabrics already purchased. 


Vogue V8812. 

Can you tell I love summer dresses? I want a floral print for this one. If I love it, I will remake in lots of other fabric choices for sure! Undecided on the bolero. 


Will you join in? I hope so! 

Next week, I will be sharing more of my pattern stash, and hopefully I will start a muslin or two! Well, hopefully at least one. 


Tuesday, January 13, 2015

My Projects: Asphalt Infinity Cowl

I recently finished this super snuggly cowl. I call it the Asphalt Infinity Cowl. 


Last weekend I wore it out for a wintry walk through the Brooklyn Botanic Garden, a place I love to go to get away from the city noise and asphalt! The snow filled garden and covered pond was beautiful. 


Despite the open work, this cowl is warm! 


Pattern: The Openwork Infinity Scarf from Knit 1 LA. Super easy and super quick! One long scarf seemed together to create a loop. This is a free pattern available here.
Needles: Size 19. Big! Wish I had used straight needles to be honest. It was difficult to bring the loops back onto the actual needle. 
Yarn: Knit Picks Biggo in Asphalt Heather. I used two skeins held together. This yarn is super soft and is made up of merino wool and nylon. 
Verdict: I would make more of these in a heart beat and certainly want to test it out with different yarns and colors. It's great to have a quick project on hand when working on a longer more involved one. Also, who doesn't love snuggly scarves when it's 20 degrees outside?  This one is a winner! 

Thursday, December 4, 2014

My Projects: Pattern Rub-Off Tutorial

Pattern rub-off skills can be quite handy! The idea here is not to copy but rather preserve a pattern of either something that fits you really well or something that is destroyed beyond repair. 

Last Summer, I made a pattern rub-off of one of my favorite pencil skirts. I love the fit of this skirt and was deeply disappointed when the brand didn't offer one in simple solid black. Really? Therefore, I decided to make one myself! I also made one in army green and am currently working on one in a lovely charcoal wool with herringbone stripes. 

 Finally, here is my tutorial. This pattern is really simple, and I suggest starting with a simple item like this from your closet. Let's get started, shall we?


1. Tools you will need:
* favorite item from your closet
*measuring tape
*muslin
*pins
*scissors
*pencil
*pattern paper
*tracing wheel (pictured below)
* Ruler (pictured below- hey I don't do tutorials very often!)

2. Find your center front and center back. Mark with a pin at both the top and bottom of the garment.
3. Put pin markers where darts end, or anything of interest. It could be area of shirring, or pleats.
4. Mark your muslin. In design school we used to have to pull the warp out. Now I mark with pencil. Dig that lead in the groove of the weave and mark your long grain. This will help you see that your fabric is straight. If it is crooked, block your fabric to get that grain line straight! 
5. Place that line on your muslin on your center front (or center back, center side etc.) and then start to define areas of interest, like this dart. Pin in the amount to keep your fabric flat. 

6. Number 5 is so important, I have repeated it for No. 6. Did you get that? This is what will shape your garment and a huge part of why this garment fits you so well. Go back and make sure your darts are perfect!
7. With your pencil mark those pins and mark the edges of your garment. Hence the term rub-off. You can use chalk as well. 
8. Everything marked? Make sure before you un-pin! Take your muslin and lie it on top of the pattern paper. Label your grain lines so you know what piece is what. They will all look the same! 
9. Time to mark your paper below with the tracing wheel. The teeth will make marks you can trace over. 

10. Look closely and you will see the teeth marks. Pencil over those marks but with your ruler and "true" them up.  They might be wavy, so you need to make sure you have straight lines with natural body curve. 
11. Mark your pattern pieces. Are you cutting 2 or 1 on the fold? Is it the center back, center front, side front? You will need to know this later.
12. True up your darts and add your half inch seam allowance, or 5/8" if you prefer. Also add notches, so when the pattern comes off your fabric later you will know what is what. 
13. Choose your fabric and lay out your pattern and cut out your new dream item! May be best to try a muslin version first and tweak your pattern if necessary. Especially if your project is much more complicated than a 2 piece pencil skirt pattern. 


Finished pencil skirt #2! Army green stretch cotton! Soon my closet (pictured behind me) will be full of these pencil skirts in many fabrications! 
Oh, and the peasant blouse I am wearing was handmade too, from a vintage pattern. More info on that here

Let me know if you have any questions and what patterns you make. 
 Good luck!

Thursday, August 21, 2014

My Projects: White Swiss Dot Peasant Blouse

You may remember my Peasant Blouse Series from last Summer. This Summer, I discovered some white Swiss dot in my fabric stash and decided to make one more peasant blouse. This is also an entry for the vintage pledge!


I used this vintage pattern. Butterick 9768. 


Here it is! Photos taken early morning at home before heading off to work. 
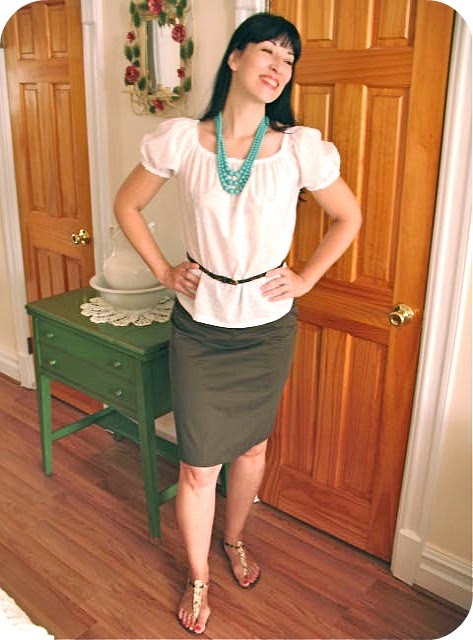
I paired it with an olive green pencil skirt that I also made at the beginning of the season. I made the skirt from a rub-off pattern of a favorite skirt of mine. Stay tuned for more information and a tutorial on that project! 


Accessories include a vintage turquoise necklace that was a gift from my husband and a leopard belt. The blouse is also quite sheer, even though you can't tell from the photos. I wore a pretty floral longline bra underneath, which made this outfit one of my favorites this Summer!


Wednesday, May 14, 2014

Mid-Week Inspiration: Vintage Sewing Pattern Pledge

 I'm not one for "sew-alongs"or "knit-alongs", heck even book clubs don't work for me. I like to work on my projects in my own time, especially since the free time I have for them is really limited. Do you remember the "That's Sew Cinematic" sew along I wanted to participate in back in 2012? Nope, I still haven't made that dress! But I still want to! 

I also want to sew more from my vintage pattern collection. I've got some goodies in there and I did tell myself at the beginning of the year that it's time to start using them. I have always sewn more from my own drafted patterns and still do. Sewing from published patterns can be strange when you are used to your own. But my collection of vintage and repro patterns needs to be explored! 

Here are a few projects from the past where I've used vintage patterns.


You may remember this swimsuit cover up from 2009. I used McCall's 6370; an adorable pattern from the Sixties.


And of course, last summer I did my peasant blouse series. That was a lot of fun. I made three using the Butterick pattern above. Black Swiss Dot, Fruity Peasant Blouse and Hawaiian. Oh and I found some white Swiss Dot in my fabric stash so I will be making one more this summer, too!

Considering the amount of sewing patterns I have, this is not a great turn out. So, I was pleased to find out about Marie's Vintage Sewing Pledge from a A Stitching Odyssey.  I first discovered it from her guest post on By Gum, By Golly. Not only did I discover the pledge but also her fine blog! I love when that happens. I also discovered that I'm not alone in the vintage pattern hoarding collecting dust scenario. This is common amongst us vintage crafty types, and we have the fabric stash to prove it. 

Marie has made a pledge at the beginning of the year to sew at least 5 of her patterns from her stash in 2014. That to me, seems achievable! I'm starting 6 months too late (realistically it will be June before I start!), but better late than never. Let's see how many I can do. Unlike other sew alongs- I've got time and can share along the way. All is required is to share with #vintagepledge on twitter. This is a pledge, not a sew-along. This is inspiring!


Here are some patterns in my hopeful pile! Oh and that Lana Turner dress too! 


Wednesday, April 30, 2014

My Projects: Mid-Week WIP's

I don't have as much time as I would like to work on my sewing and knitting projects. Mostly weekends and even those can be limited. So here is a mid-week look at my WIP's.

Queen of Hearts Bikini: I am knitting a bikini for a friend! This pattern is from the first Stitch N Bitch book. I bought that book when I decided to learn how to knit. My friend shrieked with delight when she saw the photo for this pattern and wanted me to make one for her. Well, I finally am! This is my first color work project and I have already completed one heart! The yarn is Cascade Yarns Fixation Solids which is a cotton lycra blend. Perfect for a skimpy bikini. My friend just moved to LA, so this will be perfect for her! 

Tweed Fog: This is one of a pair of fingerless gloves with a glorious cable pattern going down the front. These have been a great exercise for me. Not only am I practicing my cables but I also learned how to knit with the magic loop circular method. It's great, especially since I hate working with double pointed needles.  The yarn is Knit Picks Wool of the Andes Tweed in Wellies Heather that I had leftover in my stash. I'm really loving these gloves and I can't wait to show you the finished product!

Tuesday, April 1, 2014

My Projects: Miss Sailorette

Sometimes an unexpected trim can make a project change personality. Or at least lend itself to a new name. While in progress, these were simply called Red Lace Fingerless Gloves. Now I introduce to you Miss Sailorette!


While trim shopping last week, I fell in love with these anchor buttons and thought they would be perfect for these gloves. These gloves are lightweight enough for spring and really add some life and color after a grey and cold winter.


This is also a great pattern to learn or practice lace stitching. You could almost replace that stitch with any other to create your own version!


What do you think? What other colors would you like? 

For pattern and yarn information visit my Ravelry or Craftsy page. 


Friday, March 14, 2014

My Projects: Red Lacy Fingerless Gloves

Currently on my needles are these really fun lacy openwork fingerless gloves! I've been focusing on doing lighter knits with some lace stitches. I started working on a lace shawl, my first in fact.  I don't have any photos of that project yet because I have had to frog it several times and start over. New stitches with a fine sock yarn can test your patience! 
So, I started knitting these gloves. They incorporate some of the same stitches as the lace shawl, but in a DK weight and larger needles. I am loving how they are turning out and they are a lot easier than I thought they would be! 

Right now, they look like mini sweaters! 

Click here for the pattern. They yarn I am using is Knit Picks Swish DK in Serrano. 


Friday, February 28, 2014

My Projects: Maple Leaf Turban and Super Speedy Cabled Cowl

I have finished the Maple Leaf Turban! This is such a great and easy pattern to make!
I also had enough yarn left over to knit up a cabled cowl. This was my first cable project and I am thrilled with how easy it is. 

Quick and easy- and super warm! These look great together as a pair!


The turban is a series of knit and purl rows that are "wound" together in the front. I gathered an extra row of knitting to give it a stronger turban look. 
I had been looking for a place to use my Mother's 1960's Maple Leaf pin. I really love it here! Quite fitting. 


This cowl knitted up super fast, hence the name. It's also super cozy.


My first cables! I didn't realize they would be so easy. I'm ready to tackle another cabled project!

Yarn and pattern information can be found at these links:


Tuesday, February 4, 2014

My Projects: Maple Leaf Turban

I have a new knitting project on the needles!  You may remember the Mid-Week Inspiration last week on Turbans, well let's just say I was inspired to make one of my own. 

My Projects Maple Leaf Turban

I've long been a fan of Diane Serviss' work and her Etsy shop Pixiebell. I bought the digital download of this lovely turban pattern from her shop. Finally, I am trying my hand on one of her patterns!
My Projects Maple Leaf Turban

I am using the super soft Cascade Yarns Magnum in color Koala Bear. This is the first time I have used a super bulky yarn. Needles- size 13.

My Projects Maple Leaf Turban

Here's the start of it! So far so good. I'm going to attach a maple leaf brooch that belonged to my Mother to it. Winter fabulous! 

More information can be found on my Ravelry page

Thursday, January 16, 2014

My Projects: Yellow Fat Bottom Bag with Cherries

 I started this yellow crochet Fat Bottom Bag late last Summer. I put it down for awhile to work on Fall and Winter items and have finally picked it up again. Now it's finally finished!

Yellow Fat Bottom Bag Bobbins and Bombshells
 I crocheted cherries to decorate the front. If you remember what I was going to use for the lining, you will see why I couldn't help myself.
Yellow Fat Bottom Bag Bobbins and Bombshells

Close up of the bamboo handles. Purchased in the Garment District. 

Yellow Fat Bottom Bag Bobbins and Bombshells

Here's the lining! Remnant fabric from this project. Can't wait for Summer to wear these together. 

For more information on this pattern check out my ravelry or Craftsy page. 

Thursday, January 9, 2014

My Projects: Seed Stitch Scarf

Well, you may remember from this post that this scarf was to be a Christmas gift for my husband. I didn't finish it in time, but it is now finally done! How handsome is he modeling it? 

It's pretty basic but for some reason, knitting scarves take me forever. I am much faster at crochet. For this scarf, cast on 32 stitches and knit, purl, knit purl until you reach your desired length. The texture is really wonderful!


I used Cascade Ecological which comes in large skeins of 478 yards! When the ball was wound I couldn't believe how big it turned out. I used every bit of it. No wonder this scarf took forever. It finished over 6 feet long!

Here is a detail of the seed stitch as posted previously. You can view more details on my ravelry page. This scarf is super warm and my husband loves it!  


Tuesday, November 12, 2013

My Projects: Knitted Gifts!

The Holidays are coming! Do you make your gifts or do you join in the shopping frenzy?

I like to do a little of both, especially if that means I can practice my knitting! 

My Projects Knitted Gifts Bobbins And Bombshells

This is a simple one but I'm enjoying it.  I'm knitting a seed stitch scarf for my husband. It's something that would take a day for an experienced knitter. For me, I'm happy to get a couple of rows done after working a long day before my eyes get too sleepy. I'm hoping to have this done and a hat (ambitious!) in time for Christmas. I will keep you posted! The yarn is Cascade Ecological and it's a dream to knit! My husband loves that it's un-dyed and natural.  See more info on my Ravelry page


My Projects Knitted Gifts Bobbins And Bombshells
This cutie knitted up real quick and is for a dear friend of mine. She's about to give birth any day now!! I call this the Pea Pod U-Cord Hat and it's super newborn size so I've got to get it to her quick! These hats are fun to make and adorable. You may remember these similar versions I made earlier this year. I used Bernat's Cottontots Solid yarn and it's soft, perfect for a baby. For more yarn and pattern info check my Ravelry page.


What are working on? Will you get your gift projects done in time? 


Tuesday, October 15, 2013

My Projects: Ombre and Cherry Red Fingerless Gloves

I've recently finished some more crocheted Fingerless Gloves with Bows for my Etsy shop; The Sparkling Cocktail! I've made quite a few of these and I really enjoy playing with different color combinations.


My Projects Ombre Fingerless Gloves Bobbins and Bombshells

For these I created an ombre effect by using three different colors of yarn as opposed to ombre yarn; which never really gives a true ombre effect, in my opinion.  As you know I love these heather tweed yarns and with this effect they are really fun. What do you think? 

My Projects Ombre Fingerless Gloves Bobbins and Bombshells

These ombre gloves are available here

My Projects Cherry Red Fingerless Gloves Bobbins and Bombshells

Red is my favorite color and I haven't listed many solid colors of these, so here is a red pair! Made of Merino wool they are soft and fun for the upcoming winter and holiday season! 

My Projects Cherry Red Fingerless Gloves Bobbins and Bombshells

These red gloves are available in my Etsy shop here

What do you prefer? Solid or ombre? What colors would you like?